A simple, nerdy and meaningful programmer’s gift for your SO
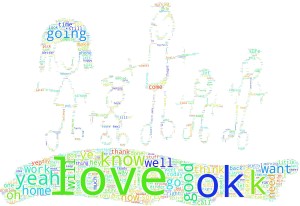
A day recently passed that my wife and I decided we would take a few moments to celebrate our many years together. As part of that I wanted to do something that had been gnawing at the back of my mind for a while. For the life of our relationship we have communicated through some form of a chatting program so I wanted to save and record that history in a meaningful way. I used a combination of tools to create an image like this.

The process is very simple.
- Acquire all your chats
- Process them all into a single text file
- Create your mask
- Generate the tag cloud against the mask file
Acquire all your chats
Our chat history was all in Google so I first went to google’s takeout and pulled down my hangout history. Unfortunately that only covers conversations from 2013 to the present. In order to get our earliest chat history I had to install thunderbird and expose the chat folder over IMAP via gmail. After thunderbird had downloaded all the email messages for my chat folder I used a thunderbird plugin ImportExportTools to export all of my emails as a CSV. I then ran them through the following script (and yes I know it could technically be ‘faster’). I ended up just using the email based ones because of time.
import csv

def process_row(row, target):
	"""Split up the row to extract only the text"""
	if target not in row:
		return
	chunks = row.split(target)
	return chunks[1].strip()

def process_message(message, first):
	"""Will extract from each row of the exported
	email's message"""
	output = []
	for row in message.splitlines():

		data = process_row(row, "me:")
		if data:
			output.append(data)
		data = process_row(row, first + ":")
		if data:
			output.append(data)
	return output

def extract_content(input, output, target_email, target_first_name):
	"""input should be the string of the csv email dump.
	output should be a string of the target text file

	ex: extract_content('emails.csv', 'output.txt',
						'hello@hello.com', 'Richard')
	"""
	with open(output, 'w') as o:
		with open(input, 'rb') as csvfile:
			emails = csv.reader(csvfile, delimiter=',')
			count = 0
			for email in emails:
				message = email[5]
				target = False
				for row in message.splitlines():
					if target_email in row:
						target = True
						break
				if target:
					content = process_message(message, target_first_name)
					for piece in content:
						o.write(piece + "\n")
					# Little sanity check while processing
					if count % 100 == 0:
						print "*" * 100
						print content
				count += 1
This provides the raw data to run through amueller’s excellent word_cloud library. I then took a snapshot of a drawing that my son had done on our family white board (glass in a window frame) and did some quick drawing over it in illustrator (inkscape) to create the mask in png format. I used a vector approach to keep the lines sharp and easy for the algorithm to detect edges.

After you have your word and your masked image you can almost just use the script detailed here. Settings that I found useful to be able to export an image of high enough quality were setting the width and height as well as increasing max_words to something like 20,000 to get a really high density cloud that filled in all the lines for the family. If you go here you can see the full list of arguments. I ended up having to use Pillow to export my images as numpy was giving me issues on my Linux machine so I was unable to use matplotlib. It was a fun and relatively easy thing to put together. Had an 8×10 printed at a 24 hour photo shop, found a cheap frame at a salvation army store and put it together.

